Git Guidelines
These guidelines are suggested for use with this repository.
Definitions
- Main Repository (on GitHub)
The main repository is located on GitHub at https://github.com/w-a-r-m-inventory-system/Food-Pantry-Inventory. This repository is the ultimate target of all changes. Currently it is managed by Shelby Elzinger.
- Public Repository (on GitHub)
This is your public repository. It is also located on GitHub at an address something like https://github.com/userid/Food-Pantry-Inventory where userid is your GitHub user Id.
This repository is where you will push all your changes before submitting a pull request for them to be applied to the main repository.
- Personal Repository (on your computer)
This repository is located on your local hard drive somewhere. It is characterized by having a “.git” directory under the top directory. That top directory will be the “project” directory for your copy of the WARM inventory system. Typically it will be the project directory for PyCharm.
Your personal repository will be linked to both the main repository and your public repository. Your personal repository will be the place you will create and test all changes before pushing them on.
Setting Up Your Working Environment
Setting Up Your Public Repository
If you have not already done so, go to GitHub.com and create a user Id for your self.
Login to GitHub with your user Id and credentials.
Go to https://github.com/w-a-r-m-inventory-system/Food-Pantry-Inventory.
Click on the box that says “Fork” in the upper right corner of the web page.
This will create your public repository under your own area on GitHub.
If this didn’t switch you back to your area of GitHub, click on the icon in the far upper right of the public repository web page to show a dropdown of choices about your area of GitHub. Click on the “Your repositories” choice.
If not there already, click on your public repository labeled “Food-Pantry-Inventory”.
Click on the green “Clone or download” button.
Click on the little clipboard icon to the right of the URL that begins “https://github.com/…”.
This will copy the full URL to your clipboard.
Save this URL somewhere. You will need it to create your personal repository below.
If you wish, you can go back to https://github.com/w-a-r-m-inventory-system/Food-Pantry-Inventory and click on the box that says “Watch”. This will notify you of changes made by other folks to the main repository.
Setting Up the PyCharm IDE
Our group has decided to all use PyCharm as our IDE for this project. Either the Community Edition (which is free) or the Professional Edition is fine. After installing PyCharm, configure it as follows to provide support for this project.
Add these plugins:
.ignore
autodoc
Markdown Navigator
Codeglance (optional)
PlantUML Integration (optional)
String Manipulation (optional)
Database Navigator (Optional)
Setting Up Your Personal Repository
Verify that you have the URL saved in step 9 above.
Start PyCharm. (If you have other projects open, please close them for the moment.)
Choose “Checkout from Verson Control” from the right side of the dialog presentd by PyCharm.
Paste the URL saved about into the URL box provided.
Click on the “Test” button to verify that you have the correct URL to access your public repository on GitHub.
Modify the value in the “Directory” box as needed and append “/Food-Pantry-Inventory” to it.
Click on the “Clone” button to create your personal repository.
Use PyCharm to establish a virtual environment for your personal repository.
Click on Preferences (Settings) -> Project: Food-Pantry-Inventory -> Project Interpreter.
It shows that this project is currently using the system Python install. We need to create a separate “virtual” environment to hold the libraries needed for this project and to protect the system Python from being “polluted” with these libraries.
Click on the gear icon in the upper right corner.
Click on Add in the dropdown.
Verify that “Virtual Environmemt” is highlighted on the far left of the dialog the comes up, and that the “New Environment” radio button has been selected.
Choose Python 3.7 as the base interpreter. (If 3.7 is not available, use 3.6 instead.)
Click on OK, then OK again.
Add these libraries/packages to the virtual environment.
Sphinx - used for documentation
sphinxcontrib-plantuml - used by Sphinx to include UML diagrams (created by PlantUML) in the Sphinx-generated documentation.
Pytest - used for testing - expecially TDD
PyYAML - used for managing configuration files
Django - used for web part of project
From the command line (either an external command prompt or using “Terminal” within PyCharm enter the following:
git remote -v
Verify that there are two lines for “origin”, that both point to your public repository, and that the first line has “(fetch)” while the second has “(push)” at the end.
Enter the following commands to allow git to pull changes from the main repository.
git remote add original https://github.com/w-a-r-m-inventory-system/Food-Pantry-Inventory.git
git remote -v
Now you should see four lines. The first two are the same as before. The third and fourth lines should begin with “original” and the URL should be for the main repository.
The label “original” is arbitrary. The following sections that discuss git and GitHub operations assume that “original” has been set this way.
Install graphviz from https://graphviz.org/. This is needed for PlantUML.
Other PyCharm Settings
There are lots of other PyCharm settings that we have not specified. You are free to set this however you wish. There may be some settings that will be effectively overridden or ignored due to our adhering to PEP 8 or using a preformatting program such as black.
Git and GitHub Operations For Our Project
Make Local Changes
Verify or set PyCharm to the master branch (should be in the very bottom right corner).
Create a new branch with a name you substitute for <newbranchname> below (can be done manually in bottom right corner or in the terminal).
git branch <newbranchname>
Make the new branch active for changes.
git checkout <newbranchname>
Make whatever changes you wish to make.
If you haven’t added new files to your personal repository any other way, add each file by highlighting it and using the menu VCS -> Git -> Add.
Commit the changes to the git branch by clicking on the project folder (Food-Pantry-Inventory) and using the menu VCS -> Git -> Commit Directory… to bring up the commit dialog.
Add a commit mesage.
The first line should be a summary of the change and be less than 72 characters long.
The second line should be blank.
The third and subsequent lines should describe the details of what changed, e.g. files added, changed, or deleted and why.
Change other areas of the commit dialog as needed.
Click on the “Commit” button.
Repeat as often as needed until your change is ready to be submitted to the main repository.
Change back to the master branch with PyCharm or by typing in the terminal command area:
git checkout master
Merge the new branch into the master branch by typing:
git merge <newbranchname>
Now that the branch has been merged back into the master, the branch name can be discarded by typing:
git branch -d <newbranchname>
Pushing Changes To Your Public Repository On GitHub
Make changes as noted above. Be sure that you have merged your changes back into the master branch.
If you have not already done so, switch back to the master branch.
Enter the following command in the terminal command area:
git push
This applies the change to your public repository so others can see those changes.
Verify that your public repository on GitHub has been updated by checking the web page for your repository. It should now say that your repository is now one (or more) commits ahead of the main branch.
Creating A Pull Request To The Main Repository
After making a change (or a set of changes), committing them to the master branch and pushing the changes to your public repository, verify that all files and changes to files are reflected in your public repository.
Log in to GitHub and go to your public repository.
Click on the “New Pull Request” button.
GitHub verifies that the changes can be applied to the main repository.
GitHub checks for conflicts, a common ancestor starting point, etc.
If GitHub allows the pull request to procede, a green “Create pull request” button will be available on the web page.
Fill in a meaningful title and comments about why this pull request should be incorporated into the main repository, what issue(s) it resolves, etc.
Markdown can be used in your comments. To see what GitHub allows for markdown see https://github.com/adam-p/markdown-here/wiki/Markdown-Cheatsheet.
Click on the green “Create pull request” button.
Send an email to Shelby that you have submitted a pull request.
Update Your Public Repository To Match The Main Repository (both On GitHub)
Verify that your public repository says that it is one (or more) commits behind the main repository.
Commit any changes you have outstanding to your current (non-master) branch.
Switch to the master branch.
Issue the following from the Terminal window or do the equvalent from PyCharm.
git pull original master

git push
The first command identifies the changes between the main repository and your personal master branch. It then automatically commits those changes to your personal repository.
The second command pushs those same changes up to your public repository.
Here is a graphical representation of this process showing the steps involved.
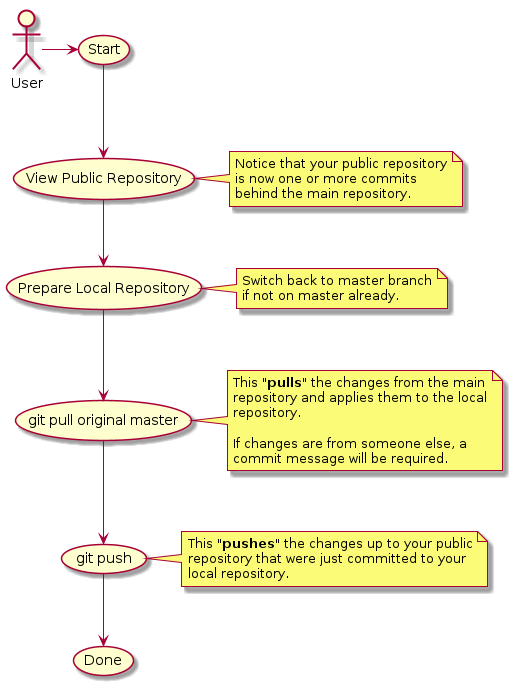
Updating From the Main Repository (Use Case)
Here is another graphical representation of this process showing the flow of information for each step.
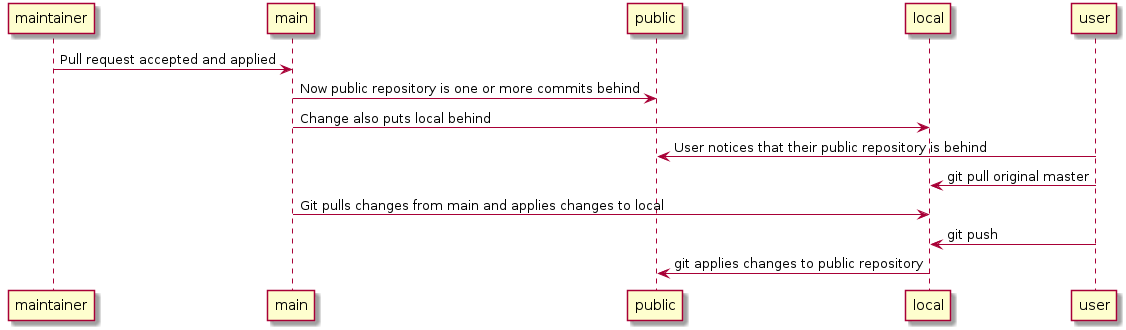
Updating From the Main Repository (Sequence Diagram)